
※ この内容は、『こみゅぷらす Tech Aid 2013』 (2013-07-27 新宿,東京) にて実際のデモと共に発表予定。
■ Roslyn について
Roslyn は、C# や Visual Basic のコンパイラーの内部の API 等を公開したものだ。"Compiler as a Service" と表現されている。
現在、次の場所や NuGet で入手可能だ。
コンパイラーのコード解析部分等の機能が公開されている。
次にあげる Channel 9 のビデオと資料が参考になるだろう。
Channel 9 にある Roslyn 関連ビデオ (古い順)
- Future directions for C# and Visual Basic - BUILD2011 (September 15, 2011)
- Going Deeper with Project Roslyn: Exposing the C# and VB compiler’s code analysis - Lang.NEXT 2012 (April 3, 2012)
- Roslyn Anders Hejlsberg Q&A: TypeScript, C#, Roslyn, and More - Build 2013 (June 27, 2013)
Roslyn には次にあげるような機能がある。
Roslyn の機能
- C# や Visual Basic のソースコード解析機能
- Visual Studio の拡張機能
- C#スクリプト機能
- 等
今回は、この中の「ソースコード解析機能」を用いて、簡単な Visual Studio のアドインを作ってみたい。
C# のソースコードを解析して、識別子等を数えて、それを WPF で作成したウィンドウに表示させてみよう。
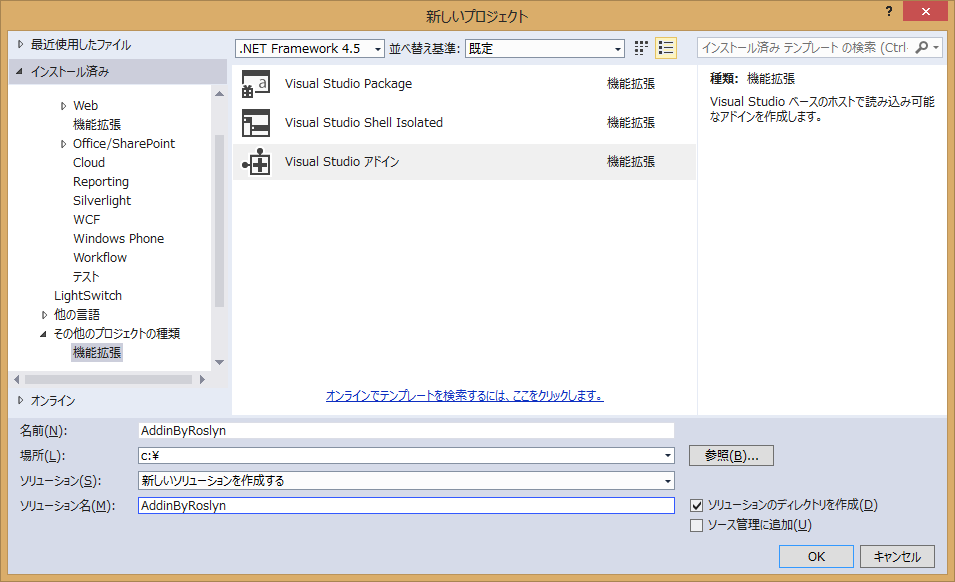
■ 「Visual Studio アドイン」プロジェクトの新規作成
先ず、Visual Studio を用いて、「Visual Studio アドイン」プロジェクトを新規作成する。
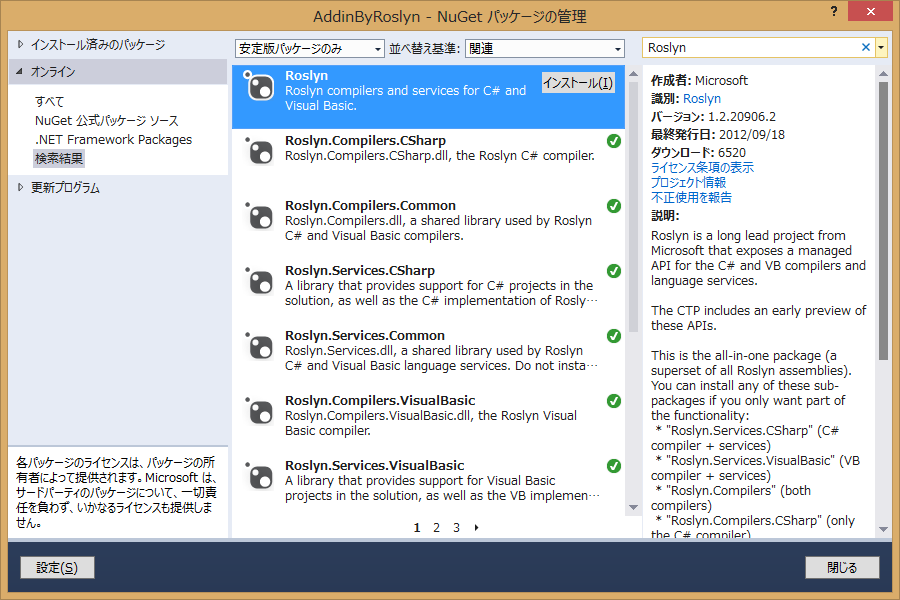
次に Roslyn をインストールし、このプロジェクトから参照する。
NuGet を使うことで、簡単にこの作業を行うことができる。
「ソリューション エクスプローラー」でプロジェクト名を右クリックし、「NuGet パッケージの管理...」を選択する。
「NuGet パッケージの管理」ダイアログ ボックスが現れるので、次のように「オンラインの検索」で、"Roslyn" を検索し、"Roslyn" を選択して「インストール」する。
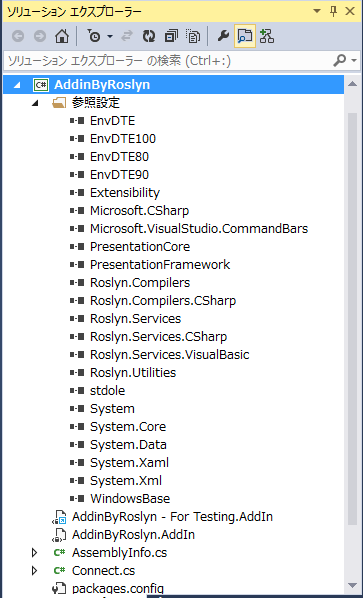
Roslyn の追加後のプロジェクトの参照設定は、次のようになる。
■ ViewModel の作成
今回は、WPF を使ってウィンドウを出すことにする。
そのウィンドウ用に、次のような ViewModel を用意した。
ソースコード内の識別子や using、クラス等の数を保持するクラスだ。
※ 実装の参考:
using System;
using System.ComponentModel;
using System.Linq.Expressions;
using System.Runtime.CompilerServices;

namespace AddinByRoslyn
{
    public static class PropertyChangedEventHandlerExtensions
    {
        public static void Raise(this PropertyChangedEventHandler onPropertyChanged, object sender, [CallerMemberName] string propertyName = "")
        {
            if (onPropertyChanged != null)
                onPropertyChanged(sender, new PropertyChangedEventArgs(propertyName));
        }

        public static void Raise<PropertyType>(this PropertyChangedEventHandler onPropertyChanged, object sender, Expression<Func<PropertyType>> propertyExpression)
        { onPropertyChanged.Raise(sender, propertyExpression.GetMemberName()); }

        static string GetMemberName<MemberType>(this Expression<Func<MemberType>> expression)
        { return *1 {
                var sourceCode = reader.ReadToEnd();
                Analyze(sourceCode);
            }
        }

        // ソース コードの中を解析
        void Analyze(string sourceCode)
        {
            // Roslyn.Compilers.CSharp.SyntaxTree クラスによるシンタックス ツリーの取得
            var tree = SyntaxTree.ParseText(sourceCode);
            Analyze(tree.GetRoot()); // シンタックス ツリーのルート要素を解析
        }

        // ルート要素の中を解析
        void Analyze(CompilationUnitSyntax root)
        {
            viewModel.Clear();
            stringBuilder = new StringBuilder();
            Visit(root); // Visit メソッドにより、全ノードを辿る (Visitor パターン)
            viewModel.Result = stringBuilder.ToString();
        }

        // 全ノードについて
        public override void DefaultVisit(SyntaxNode node)
        {
            base.DefaultVisit(node);
            // ノードの情報を stringBuilder に追加
            stringBuilder.AppendLine(string.Format("NodeType: {0}, Node: {1}", node.GetType().Name, node.GetText()));
        }

        // 識別子のノードの場合
        public override void VisitIdentifierName(IdentifierNameSyntax node)
        {
            base.VisitIdentifierName(node);
            viewModel.IdentifierCount++; // 識別子を数える
        }

        // using のノードの場合
        public override void VisitUsingDirective(UsingDirectiveSyntax node)
        {
            base.VisitUsingDirective(node);
            viewModel.UsingCount++; // using を数える
        }

        // クラスのノードの場合
        public override void VisitClassDeclaration(ClassDeclarationSyntax node)
        {
            base.VisitClassDeclaration(node);
            viewModel.ClassCount++; // クラスを数える
        }

        // フィールドのノードの場合
        public override void VisitFieldDeclaration(FieldDeclarationSyntax node)
        {
            base.VisitFieldDeclaration(node);
            viewModel.FieldCount++; // フィールドを数える
        }

        // プロパティのノードの場合
        public override void VisitPropertyDeclaration(PropertyDeclarationSyntax node)
        {
            base.VisitPropertyDeclaration(node);
            viewModel.PropertyCount++; // プロパティを数える
        }

        // メソッドのノードの場合
        public override void VisitMethodDeclaration(MethodDeclarationSyntax node)
        {
            base.VisitMethodDeclaration(node);
            viewModel.MethodCount++; // メソッドを数える
        }

        // 変数のノードの場合
        public override void VisitVariableDeclaration(VariableDeclarationSyntax node)
        {
            base.VisitVariableDeclaration(node);
            viewModel.VariableCount++; // 変数を数える
        }

        // if のノードの場合
        public override void VisitIfStatement(IfStatementSyntax node)
        {
            base.VisitIfStatement(node);
            viewModel.IfCount++; // if を数える
        }

        // シンプルなラムダ式のノードの場合
        public override void VisitSimpleLambdaExpression(SimpleLambdaExpressionSyntax node)
        {
            base.VisitSimpleLambdaExpression(node);
            viewModel.LambdaCount++; // ラムダ式を数える
        }

        // 括弧付きのラムダ式のノードの場合
        public override void VisitParenthesizedLambdaExpression(ParenthesizedLambdaExpressionSyntax node)
        {
            base.VisitParenthesizedLambdaExpression(node);
            viewModel.LambdaCount++; // ラムダ式を数える
        }
    }
}
■ View の作成
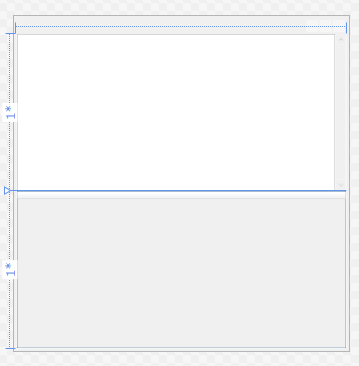
次に View を追加する。プロジェクトに "View" という名前の WPF のウィンドウを一つ追加する。
この View は、先の ViewModel を表示するためのウィンドウだ。
プロジェクトに System.Xaml への参照設定の追加が必要になる。
View.xaml
XAML の Grid 内に、ViewModel の "Result" を表示するための TextBox と "Data" を表示するための DataGrid を追加しておく。
<Window x:Class="AddinByRoslyn.View"
        xmlns="http://schemas.microsoft.com/winfx/2006/xaml/presentation"
        xmlns:x="http://schemas.microsoft.com/winfx/2006/xaml"
        xmlns:mc="http://schemas.openxmlformats.org/markup-compatibility/2006"
        xmlns:d="http://schemas.microsoft.com/expression/blend/2008"
        mc:Ignorable="d"
        d:DesignHeight="500" d:DesignWidth="500">
    <Grid>
        <Grid.RowDefinitions>
            <RowDefinition Height="*"/>
            <RowDefinition Height="*"/>
        </Grid.RowDefinitions>
        <TextBox TextWrapping="Wrap" Text="{Binding Path=Result}" Grid.RowSpan="2" FontFamily="Meiryo" FontSize="14" IsReadOnlyCaretVisible="True" VerticalScrollBarVisibility="Auto" />
        <DataGrid Grid.Row="1" ItemsSource="{Binding Path=Data}" FontFamily="Meiryo" FontSize="14" />
    </Grid>
</Window>
View.xaml.cs
View の C# 部分では、ViewModel のインスタンスを保持し、それを DataContext とする。
また、コンストラクターで C# のソース ファイル名を受け取り、それを上で作成した SyntaxCounter クラスを使って解析する。
using System.Windows;

namespace AddinByRoslyn
{
    public partial class View : Window
    {
        ViewModel viewModel = new ViewModel();

        public View(string sourceFileName)
        {
            InitializeComponent();
            DataContext = viewModel; // DataContext に ViewModel のインスタンスを設定

            if (!string.IsNullOrWhiteSpace(sourceFileName))
                // SyntaxCounter クラスを用いたソース ファイルの解析
                new SyntaxCounter(viewModel).AnalyzeSourceFile(sourceFileName);
        }
    }
}
■ Visual Studio アドイン部
最後に、Visual Studio アドイン部のコードをカスタマイズする。
カスタマイズするのは、プロジェクトの新規作成時に自動生成された Connect.cs だ。
Exec というメソッドがあるので、この中で View を作成し、ソースコード ファイル名を渡すようにする。
using EnvDTE;
using EnvDTE80;
using Extensibility;
using Microsoft.VisualStudio.CommandBars;
using System;

namespace AddinByRoslyn
{
    public class Connect : IDTExtensibility2, IDTCommandTarget
    {
        DTE2 _applicationObject = null;
        AddIn _addInInstance = null;

        public void OnConnection(object application, ext_ConnectMode connectMode, object addInInst, ref Array custom)
        {
            _applicationObject = (DTE2)application;
            _addInInstance = (AddIn)addInInst;
            if(connectMode == ext_ConnectMode.ext_cm_UISetup) {
                var contextGUIDS = new object[] { };
                var commands = (Commands2)_applicationObject.Commands;
                var toolsMenuName = "Tools";
                var menuBarCommandBar = *2; // View のインスタンスにソースファイル名を渡す
                view.Show();
                handled = true;
            } else {
                handled = false;
            }
        }

        // ソース ファイル名の取得 (追加する private メソッド)
        string GetSourceFileName()
        {
            var items = _applicationObject.SelectedItems;
            if (items.Count == 0)
                return null;
            var item = items.Item(1);
            return item.ProjectItem.get_FileNames(1);
        }
    }
}
■ 実行
それでは、試してみよう。
Visual Studio から実行してみると、別の Visual Studio が起動する。
新たに起動した Visual Studio で、メニュー から「ツール」 - 「アドイン マネージャー」を開く。
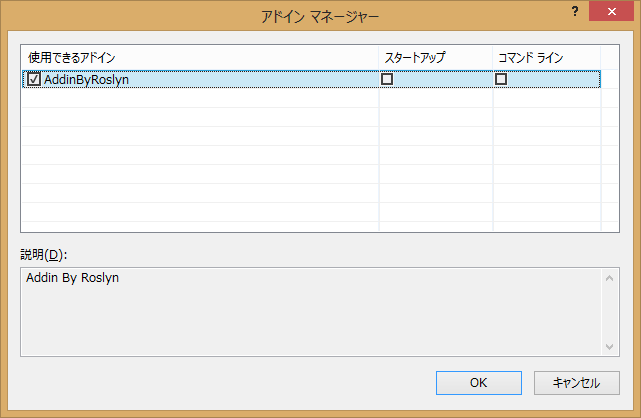
作成したアドインが追加できるようになっているのが分かる。
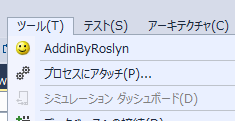
実際に、新たに起動した Visual Studio で今回作成したプロジェクトを開き、ViewModel.cs を開いた状態で、アドインを実行してみよう。
新たに起動した方の Visual Studio で、メニュー から「ツール」 で、新しいアドインを実行する。
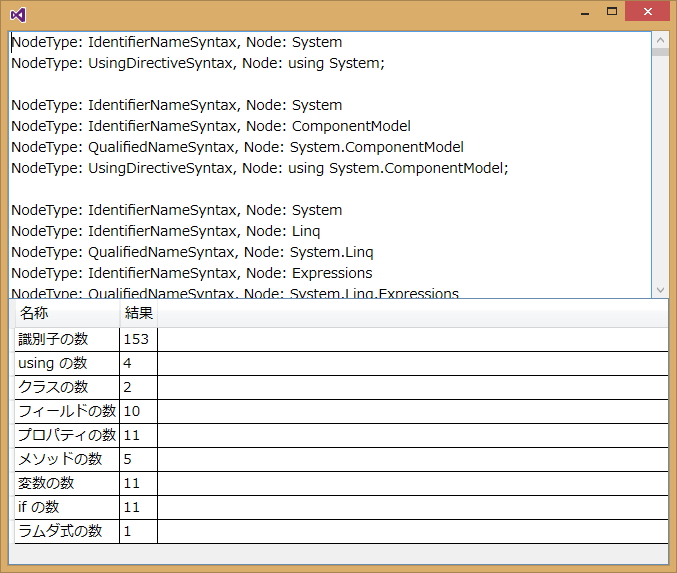
アドインが起動すると、ウィンドウが開き、結果が表示される。
■ まとめ
今回は、Roslyn を使って単に何種類かの文法要素を数えただけだが、同様の方法で、より複雑な解析を行ったり、一部を変更したりすることもできる。
また、先に述べたように、Roslyn の機能は C# や Visual Basic のソースコードの解析だけではない。他の機能についても、いずれ解説して行きたい。
*1:MemberExpression)expression.Body).Member.Name; } } public class ViewModel : INotifyPropertyChanged { public event PropertyChangedEventHandler PropertyChanged; int identifierCount = 0; public int IdentifierCount { get { return identifierCount; } set { if (value != identifierCount) { identifierCount = value; PropertyChanged.Raise(this); RaiseUpdateData(); } } } int usingCount = 0; public int UsingCount { get { return usingCount; } set { if (value != usingCount) { usingCount = value; PropertyChanged.Raise(this); RaiseUpdateData(); } } } int classCount = 0; public int ClassCount { get { return classCount; } set { if (value != classCount) { classCount = value; PropertyChanged.Raise(this); RaiseUpdateData(); } } } int fieldCount = 0; public int FieldCount { get { return fieldCount; } set { if (value != fieldCount) { fieldCount = value; PropertyChanged.Raise(this); RaiseUpdateData(); } } } int propertyCount = 0; public int PropertyCount { get { return propertyCount; } set { if (value != propertyCount) { propertyCount = value; PropertyChanged.Raise(this); RaiseUpdateData(); } } } int methodCount = 0; public int MethodCount { get { return methodCount; } set { if (value != methodCount) { methodCount = value; PropertyChanged.Raise(this); RaiseUpdateData(); } } } int variableCount = 0; public int VariableCount { get { return variableCount; } set { if (value != variableCount) { variableCount = value; PropertyChanged.Raise(this); RaiseUpdateData(); } } } int ifCount = 0; public int IfCount { get { return ifCount; } set { if (value != ifCount) { ifCount = value; PropertyChanged.Raise(this); RaiseUpdateData(); } } } int lambdaCount = 0; public int LambdaCount { get { return lambdaCount; } set { if (value != lambdaCount) { lambdaCount = value; PropertyChanged.Raise(this); RaiseUpdateData(); } } } public object Data { get { return new [] { new { 名称 = "識別子の数" , 結果 = IdentifierCount }, new { 名称 = "using の数" , 結果 = UsingCount }, new { 名称 = "クラスの数" , 結果 = ClassCount }, new { 名称 = "フィールドの数", 結果 = FieldCount }, new { 名称 = "プロパティの数", 結果 = PropertyCount }, new { 名称 = "メソッドの数" , 結果 = MethodCount }, new { 名称 = "変数の数" , 結果 = VariableCount }, new { 名称 = "if の数" , 結果 = IfCount }, new { 名称 = "ラムダ式の数" , 結果 = LambdaCount } }; } } string result = string.Empty; public string Result { get { return result; } set { if (value != result) { result = value; PropertyChanged.Raise(this); } } } public void Clear() { IdentifierCount = UsingCount = ClassCount = FieldCount = PropertyCount = MethodCount = VariableCount = IfCount = LambdaCount = 0; Result = string.Empty; } void RaiseUpdateData() { PropertyChanged.Raise(this, () => Data); } } }
■ Roslyn を用いたコード解析部の作成
では、Roslyn を用いたコード解析部を作成してみよう。
ここでは、Roslyn にある Roslyn.Compilers.CSharp.SyntaxWalker というクラスを継承して SyntaxCounter というクラスを作成する。
この SyntaxWalker クラスは、Visitor パターンになっていて、Visit メソッドを呼ぶことで、全ノードを辿り、ノードの種類毎の virtual メソッドを呼んでくれる。
例えば、識別子のノードの場合には、VisitIdentifierName という virtual メソッドが呼ばれる。
それぞれの virtual メソッドをオーバーライドすることで、そこに処理を書くことができる訳だ。
SyntaxCounter では、オーバーライドしたメソッドのそれぞれで呼ばれた回数を数えることで、ソースコード内の、識別子や using、クラス等の数を知ることにする。
using Roslyn.Compilers.CSharp;
using System.IO;
using System.Text;

namespace AddinByRoslyn
{
    class SyntaxCounter : SyntaxWalker
    {
        readonly ViewModel viewModel;
        StringBuilder stringBuilder; // viewModel.Result 用

        public SyntaxCounter(ViewModel viewModel)
        { this.viewModel = viewModel; }

        // ソース ファイルの中を解析
        public void AnalyzeSourceFile(string sourceFileName)
        {
            using (var reader = new StreamReader(sourceFileName, false
*2:CommandBars)_applicationObject.CommandBars)["MenuBar"];
                var toolsControl = menuBarCommandBar.Controls[toolsMenuName];
                var toolsPopup = (CommandBarPopup)toolsControl;

                try {
                    var command = commands.AddNamedCommand2(_addInInstance, "AddinByRoslyn", "AddinByRoslyn", "Executes the command for AddinByRoslyn", true, 59, ref contextGUIDS, (int)vsCommandStatus.vsCommandStatusSupported+(int)vsCommandStatus.vsCommandStatusEnabled, (int)vsCommandStyle.vsCommandStylePictAndText, vsCommandControlType.vsCommandControlTypeButton);
                    if (command != null && toolsPopup != null)
                        command.AddControl(toolsPopup.CommandBar, 1);
                } catch(System.ArgumentException) {
                }
            }
        }

        public void OnDisconnection(ext_DisconnectMode disconnectMode, ref Array custom) {}
        public void OnAddInsUpdate (ref Array custom) {}
        public void OnStartupComplete(ref Array custom) {}
        public void OnBeginShutdown (ref Array custom) {}

        public void QueryStatus(string commandName, vsCommandStatusTextWanted neededText, ref vsCommandStatus status, ref object commandText)
        {
            if (neededText == vsCommandStatusTextWanted.vsCommandStatusTextWantedNone &&
                commandName == "AddinByRoslyn.Connect.AddinByRoslyn")
                status = (vsCommandStatus)vsCommandStatus.vsCommandStatusSupported|vsCommandStatus.vsCommandStatusEnabled;
        }

        // カスタマイズする Exec メソッド
        public void Exec(string commandName, vsCommandExecOption executeOption, ref object varIn, ref object varOut, ref bool handled)
        {
            if (executeOption == vsCommandExecOption.vsCommandExecOptionDoDefault &&
                commandName == "AddinByRoslyn.Connect.AddinByRoslyn") {
                var view = new View(GetSourceFileName(